11.25.2008

Your Blog is Fabulous!

I was having 'blog time' and was reading over at Lesley and Pinktoque and much to my surprise she thought enough of this blog to give it the "Your Blog is Fabulous" award. Thanks so much! Lesley has been such and inspiration to me with my digital scrap booking and general crafting. Pop on over HERE to check her out.

As per the instructions here are my 5 addictions (at the moment):
1. Digital Scrapbooking
2. Preparing for Christmas
3. Preparing for Thanksgiving
4. Plucking my eyebrows ( you asked!)
5. Finding ways to pinch yet another penny!

I am suppose to pass this onto 5 other bloggers but I don't know that many!! I promise as I find blogs that are deserving I will pass it along! Thanks so much Lesley and Pinktoque.com!!

Christmas Make-It Take-It


I love to give home made gifts to the people at Bob's office, Emily's preschool buddies and friends. Being a penny pincher I am looking for the most bang for my buck. Being a people person I want everyone to share in my findings. So is born the Christmas Make-It Take-It. I send out an E-vite inviting people to the event complete with the details of time, place, what will be made and the cost per project. In the "what to bring drop down" I have them select how many units they would like so I can plan!

This year I was inspired by Harry & David's popcorn selections we will be doing a variation of gourmet popcorn. Now we have not completed the task (our MITI is Dec. 15) but this is how I am anticipating it going:

Air pop the popcorn (this will give it a nice light feel with out oil to weigh it down.)
Put the popcorn in the biggest bowl you can find.
Melt chocolate chips in the microwave and drizzle over the popcorn.
While the chocolate is still soft add peanuts, sprinkle with salt and add dried cranberries. (omit the peanuts if you have a peanut allergy or if this popcorn is going to a place with children.) Feel free to add or omit items to fit your tastes. Other options include M&M's, pretzels and white chocolate chip morsels.
Stir to coat.
Spread on cookie sheets
Pop into the freezer to set the chocolate. This should take about 10 minutes.
Fill cello bags.
Fold over and staple.
Add a bag topper if you want. ( I am hoping to have one to download that you can use in a future post. I am just not there yet. I wanted to just plant this seed in your head)

Whalla! You now have a yummy,cheap, gourmet gift to give to co-workers, family & friends.

11.14.2008

Unclog a drain


Our upstairs bathroom sink drain has been slower than molasses forever! I blame it on the builders whom built the house. In my mind they did not put enough of a slant on the drain pipe so that the drain will empty properly. But much to my chagrin it was just clogged.

I started my using tweezers to pull hair and gunk out from the open drain. I was quite disgusted with this step. Next I dumped about 1/4 cup of salt down the drain. I did have to kind of shove it in with my fingers. Next I poured about a 1/2 cup of baking soda down the drain. I did have to do more shoving of the baking soda down the drain. Next came the fun part. I poured about 2 cups of white vingar down the drain. I did this slowly. Then I plugged the drain and took a shower.

After my 15-20 minute shower I ran hot water down the sink drain. The sink now drains much better than it did before.

The salt acted as an aggregate in the pipes and the baking soda/vinegar mixture had a chemical reaction acting as a vehicle to agitate the salt.

11.12.2008

Baking Mix

I am getting ready to make our dinner of sausage and egg biscuits along with a cheese quiche.  I pull out my box of Bisquick and know from the weight of it there is NO WAY it will make a batch of biscuits.  Now is the perfect opportunity to try out a recipe I have wanting to try.

Home Made Baking Mix

4 cups all-purpose flour
1/4 cup granulated sugar
1/2 cup dry nonfat milk
1 tablespoon baking powder
2 1/2 teaspoons baking soda
2 teaspoons kosher salt

INSTRUCTIONS
In a large bowl, mix all ingredients together until evenly combined. Store at room temperature in a resealable plastic bag until ready to use.

Now you can use this as if you would Bisquick.  But you have pinched a few pennies in the process.

11.11.2008

Limoncello


Limoncello. Just saying it makes me want to go to Italy.  But then again, it doesn't take much for me to WANT to go to Italy.  Limoncello is a fabulous lemon liqueur originating from southern Italy made from the rinds of lemons,  alcohol, sugar and water.  (There are just so many fabulous things about that last sentence!)  If you have not had the pleasure of having limoncello as an after dinner digestivo or over ice cream you need to try this recipe.  From what I have heard making your own is far better than what you can purchase at the liquor store.

After watching Michael Chiarello on the Food Network I was surprised at how easy it was to make!  I use vodka in my recipe because vodka is so cheap!  I find the cheapest bottle I can find because I am just going to be flavoring it, not enjoying it for the flavor of vodka. I was so cheap, yummy and easy to make, I made it for my husband to take to the office for Christmas presents.  It was well received!  If you are thinking of making this for Christmas presents I would get started very soon.  It takes 4 weeks to macerate.  So here you go:

Limoncello
Recipe courtesy Michael Chiarello Show: Easy Entertaining with Michael Chiarello Episode: Gaucho Gusto

Ingredients

12 Meyer lemons, or a mixture of lemons and limes, peel only, no pith
3 sprigs lavender, optional but lovely
2 liters light rum or vodka
6 cups sugar
3 cups water

Directions

Put the lemon peels, lavender, if using, and rum or vodka in a container and let stand for 4 weeks.

Strain the mixture into a decanter.

Mix the sugar and water in a medium saucepan and bring to a boil. Reduce the heat and simmer until the sugar has dissolved. Let cool before adding to the rum mixture.

Serve in small aperitif glasses.

Store in the freezer for up to 1 year.

**If you are truly pinching pennies I found this recipe can be cut in 1/2 but if you are waiting 4 weeks for it to macerate you are going to want it more and more.  

11.09.2008

Brine that Turkey!


Thanksgiving will be here before you know it.  I know you have been racking up 'turkey points' at your local grocer to get your 'free' turkey.  If you are going to the in-laws for Thanksgiving and still have the certificate for the free turkey, go ahead and either give the turkey certificate to your local food bank or give the actual turkey to the food bank.  I am sure either would be appreciated.  But call ahead and see if they have a preference.  

If you one who actually uses your turkey and it seems like you never seem to get the turkey quite right...try brining your turkey this year.  I tried this a few years ago and have not looked back since.  I am partial to Alton Brown and the Food Network but feel free to search for your own formula.  If you don't want to do the research here is the formula I use: HERE

Please pre-read all of the directions.  If you have a frozen turkey and are not sure how to properly thaw it go HERE.  The USDA can help you get that turkey thawed.

Ingredients
1 (14 to 16 pound) frozen young turkey

For the brine:
1 cup kosher salt
1/2 cup light brown sugar
1 gallon vegetable stock (HIPP has used chicken stock)
1 tablespoon black peppercorns
1/2 tablespoon allspice berries
1/2 tablespoon candied ginger (HIPP has left this out but if you have it use it.)
1 gallon iced water

For the aromatics:
1 red apple, sliced
1/2 onion, sliced
1 cinnamon stick
1 cup water
4 sprigs rosemary
6 leaves sage
Canola oil

Directions
Combine all brine ingredients, except ice water, in a stockpot, and bring to a boil. Stir to dissolve solids, then remove from heat, cool to room temperature, and refrigerate until thoroughly chilled.

Early on the day of cooking, (or late the night before) combine the brine and ice water in a clean 5-gallon bucket. (HIPP used the huge stock pot that I used in the Laundry Detergent Post) Place thawed turkey breast side down in brine, cover, and refrigerate or set in cool area (like a basement) for 6 hours. Turn turkey over once, half way through brining.

A few minutes before roasting, heat oven to 500 degrees. (that is not a typo!) Combine the apple, onion, cinnamon stick, and cup of water in a microwave safe dish and microwave on high for 5 minutes.

Remove bird from brine and rinse inside and out with cold water. Discard brine.

Place bird on roasting rack inside wide, low pan and pat dry with paper towels. Add steeped aromatics to cavity along with rosemary and sage. Tuck back wings and coat whole bird liberally with canola (or other neutral) oil.

Roast on lowest level of the oven at 500 degrees F. for 30 minutes. Remove from oven and cover breast with double layer of aluminum foil, insert probe thermometer into thickest part of the breast and return to oven, reducing temperature to 350 degrees F. Set thermometer alarm (if available) to 161 degrees. A 14 to 16 pound bird should require a total of 2 to 2 1/2 hours of roasting. Let turkey rest, loosely covered for 15 minutes before carving.


This is the best turkey I have ever eaten.  Get the most out of your 'free' turkey and cook it correctly.

11.07.2008

Cinnamon Ornaments

Thanksgiving is over and the boys are watching football.  You know what that means!  It is craft time!  Clear the table, round up the kids and prepare to get messy!  

This year try making Cinnamon Ornaments.
For 5 ornaments you are going to need:
1 cup ground cinnamon ( go to your big box store and get the big canister of ground cinnamon)
1 cup applesauce (use the cheapest you can find please!)
1/4 cup white glue
This can be doubled or tripled depending on how many people are participating.

Mix everything in a bowl.  If it seems to stiff for rolling out add a touch of water.  Knead the dough till it is play dough-like.  Allow it to rest while you plan what type of ornament you are going to make and how you are going to decorate them.

Gingerbread men, hearts and candy canes are just a few suggestions.  It is also cute to make a flat circle and press a child's hand into the dough making an impression.  Be sure to write the child's name and the date with a toothpick next to the impression.

Roll out the dough between 2 pieces of wax paper.  If you are brave roll it out on a clean flat surface.  If you dough is sticky use a bitt of cinnamon to dust your surface or rolling pin.  Do not use flour.

Roll to 1/2" - 1/4" in thickness.  Cut out with cookie cutters or mold into what ever shape you would like.  If you have a flat ornament you can use a straw, dowel rod or pencil to poke a hole for a place for the hanger to attach.   Another option is to  press a metal ornament hanger or an unfolded paper clip into the back.

Now you have the option of baking them at 200* for 2 hours (flip 1/2 way through) or let them air dry for 3-5 days.

11.06.2008

Stinky Diaper Pails


I have a diaper champ.  It is pushing 5 years old so I am not real sure how good the  seals are anymore because after a stinky diaper or two the nursery starts to reek!  When it was brand new I could go for days with out smelling anything.  So off to the internet to see if I could find something to suck up the smells wafting from the diaper pail.  I knew that baking soda was an excellent absorber of odors but I wanted to see if there was anything else out there.  Turns out the consensus is that baking soda is the way to go.  But there is a twist.  You need to make a baking soda cake.  Here is how I did it.

2 cups baking soda ( I have the 5 pound box in my pantry)
1 Tablespoon water ( or more)
5-10 drops essential oil 
**pssst.  I didn't use essential oil.  I don't have any in house at the moment.  I used Yankee Candle home fragrance oil.

Combine the oil, baking soda and water thoroughly.  The texture should be like damp sand.  Line a mini muffin pan with paper cups.  Scoop mixture into cups to fill them 1/2-3/4 full.  Use your fingers or a shot glass bottom to press the baking soda tightly into the paper cup.  Allow to dry thoroughly.  Up to 24 hours.  Store in an airtight container.

To use:
Place a baking soda cake in between the can liner and the diaper pail.  Change once a week.  If you do use essential oil you can drop the cake in your wash.  It will naturally soften the water making your clothes soft.  I wouldn't do this if you used the oil from Yankee like I did!

11.05.2008

Left Over Halloween Candy


Trick or treat is over and your kids have a huge bag of candy that they do not need.  Now is the time to assert you parental authority and confiscate a couple of handfuls.  We are now going to make my version of Sinful Saltines.

Preheat oven to 350 F.

Spray a sided cookie sheet with non-stick cooking spray (or rub down with cooking oil)
Line the pan with saltine crackers.

In a pot bring 3/4 cup butter and 3/4 cup brown sugar to a boil.
Once boiling, stir continually while boiling for 4 minutes.

Pour the hot butter/sugar mixture over the crackers and spread with a spatula.

Bake for 10 minutes.

Sprinkle 1 cup of chocolate chips over the hot crackers.  Allow to soften for 3 minutes.  Spread to completely cover the crackers with chocolate.  

Chop your leftover halloween candy.  I would advise pretzels, M&M's, chopped up miniature bars, and raisins.  But feel free to use what you want.
Pop into your freezer for 1/2 hour or until frozen.

Now that it is frozen it should break apart easily.  Do your best not to eat the entire batch in one sitting.

11.04.2008

Corn Fritters MMMM


It is dinner time. You have the cabinets open waiting for something to speak to you. A lonely can of corn is staring back at you begging to be used. But who wants to eat canned corn? So here is a recipe that I like for Corn Fritters:

1 15 oz can corn (undrained)
1 egg
1/2 t. salt
1 c. flour
1 t. baking soda
1 t. baking powder
1 t. sugar

Honey for dipping

Heat your frying oil to 350. To check it with out a thermometer use a wooden spoon and hold the end touching on the bottom of the pan. If bubbles come up like champagne bubbles you are good!


Stir all your dry ingredients together. Add the egg and the whole can of corn. Stir to combine. If the batter is more cookie dough-like than thick pancake batter with corn in it.....add a bit of water.

Use a scoop of your choosing. I like to use my smallest one. Keep in mind your fritters are going to just about double in size upon frying. I have noticed that my fritters turn themselves over when one side is finished cooking. From time to time they need a slight push. Use tongs to do so.

Once golden brown all around transfer to a paper towel lined plate. Sprinkle with salt.

Serve with honey. Other options are powdered sugar or ranch dressing.

Not the most fat free suggestion but this blog is about pinching pennies...not fighting fat.

11.03.2008

$25 gift certificates for $10?!


I recently received an e-mail from a friend telling me about Restaurant.com. Turns out this is a web site where you can purchase gift certificates to restaurants in your area worth $25 for only $10. What a great way to try a restaurant with out putting out the full amount for the bill!

This is a win/win situation. You get a gift certificate for $10 with a face value of 2 1/2 times the purchase price. And the restaurant gets you in their door with the hopes of making you a repeat customer. Be sure to refer to the website for further details, restaurants in you area, and offers may vary from location to location. Happy penny pinching!

11.02.2008

Prepare Pumpkin Puree


Want to impress your in-laws with your pumpkin pie this Thanksgiving? Your new 'secret' this year is going to be that you used a fresh pumpkin instead of canned pumpkin. Pinch a penny and pick left over pumpkins and make your puree today! This week would be a great week to hit your local farm stand, grocery store or pumpkin patch and pick up pumpkins left over from Halloween. It is my estimation that you will be able to get your pumpkin for at least half price. But don't compromise the great price for a poor pumpkin. For this project you are going to want the smaller pumpkins, smooth skin and good orange color. Leave behind the pumpkins with bruises.

Once you get your pumpkin home wash it well. Cut off the top and scoop out the seeds and pulp as you would as if you were going to carve it for a jack-o-lantern. Now choose your cooking method. I would recommend either roasting or steaming. Directions are as follows:

Roasting
1. Cut your pumpkin in 1/2.
2. Heat your oven to 350 F.
3. Place your pumpkin cut size down on a cookie sheets with sides or in a baking dish.
4. Cover with foil and roast for 1 hour or until the pumpkin 'meat' is fork tender.
5. Proceed to puree and storage directions.

Steaming
1. Cut your pumpkin in to pieces small enough to fit in your steamer basket.
2. Steam the pumpkin pieces for 20-30 minutes or until the pumpkin 'meat' is fork tender.
3. Proceed to puree and storage directions.
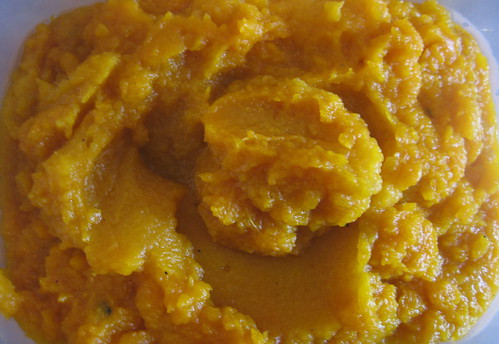
Puree and Storage
1. Scoop out the pumpkin meat and place in a food processor and process. OR use a blender *safety note* only fill the blender 1/4-1/3 full if the pumpkin is hot.
2. If your puree is too thick for your likeness add a little of the steaming juices (if you steamed) and water if you roasted.
3. Cool completely.
4. Place in freezer bags, freezer safe containers or Food Saver bags.
5. Freeze till Thanksgiving or up to 6 months.


Don't forget to pull our puree out in time to thaw before your make your pies! Be aware that this will not be the same as PUMPKIN PIE FILLING. This will be the same as or better than PUMPKIN.

11.01.2008

Say Cheese!


Another way I pinch pennies is to shred my own cheese. If you compare the price per pound of shredded vs. block cheese in your dairy case you will see that the block cheese is significantly cheaper. (I must give the discloser that I am referencing store brand block cheese.) When you shred your own cheese on a box grater you have to work for your shreds. Therefore you might be apt to shred less cheese thus saving yourself money and calories! If you use a food processor with a grater blade it is not as much work but you do have more clean up!

But there is an added bonus to shredding your own cheese. No calcium sulfate. If you look on the back of your shredded cheese bag there will be listed "calcium sulfate, added to prevent caking". At least that is how it is listed on my bag of KRAFT natural shredded low-moisture part-skim mozzarella cheese. (my mom left it at my house last time she came for a visit)

But what is calcium sulfate and why don't I want it? It has calcium in it. Isn't calcium good? Calcium yes. Calcium Sulfate no. I looked it up on Wikipedia and this is what I found:
Calcium sulfate is a common laboratory and industrial chemical..... It is also used as a coagulant in products like tofu. In the natural state, unrefined calcium sulfate is a translucent, crystalline white rock. The hemihydrate (CaSO4.~0.5H2O) is better known as plaster of Paris, while the dihydrate (CaSO4.2H2O) occurs naturally as gypsum.

Did you catch that? There is food safe plaster of Paris coating your shredded cheese. **Shudder**